Materials/Spend:
- 2x MAXXAIR VENT Model 4500K - £520.00
- W4 Narrow Mastic Sealing Strip - White, 5m x 19mm - £11.96
- SikaFlex EBT+ Adhesive, Sealant and Filler, Grey, 300 ml - £6.99
- MEM Dicht-Fix 500220 Sealing Fix 375 ml - £12.60
Electrical
- 1.5mm Cable - Red - £7.50
- 1.5mm Cable - Black - £7.50
- Heat Shrink Cable Connectors (320pcs) - £24.99
- Blade fuses - Came with fuse box
TOTAL: £591.54
The main reason I decided on the MAXXAIR VENT Model 4500K was because they have a clear fan blade so they’ll do the job ventilating the van but won’t block out all of the light. The fans also rotate in both directions, which means I can get a nice air flow through the van.
Some bonus features, that I wasn’t too fussed about in truth, are a remote control and also an automatic rain detector - so the vents will close automatically when they sense rain.
The previous owner of the van was kind enough to fit two horrible (and leaking) extractor fans in the roof and they had some circular holes cut to match. I’m going to cut square holes around the existing holes and fit my new fans in the same place.
Cutting the Hole
Once up on the roof, the first step was to remove the vent covers that were covering the holes. These were easily removed with a crowbar and quickly discarded. This then left me with 2 exposed and very dirty circular holes in my roof.
Before applying any adhesive directly to the roof, it’s a good idea to clean the area of any dirt, rust and other bits and bobs. I got the vacuum out to remove the majority of the debris and then cleaned with a brush.
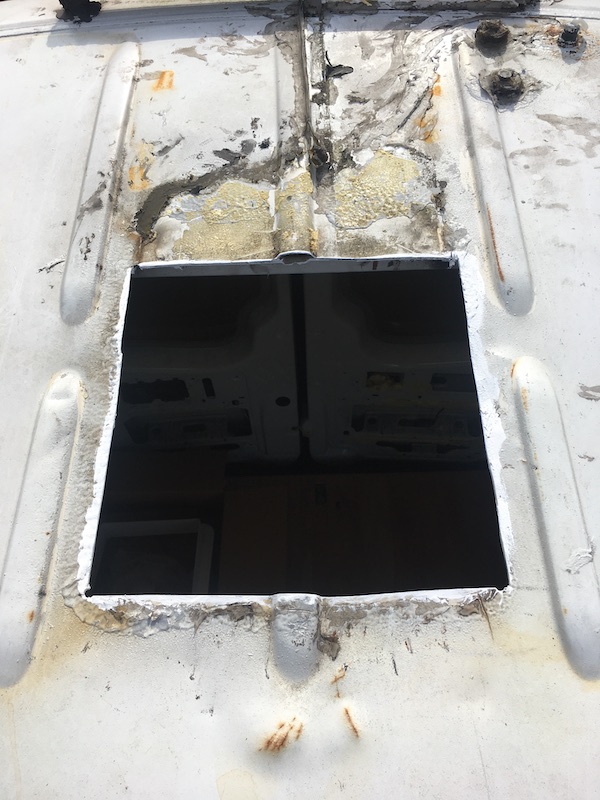
I then marked out my cutting area with a Sharpie pen. My new vents are 350mm x 350mm in dimension and conveniently the old vent covers were 350mm x 310mm, so I could use the same height and then measure out an extra 20mm on each side.
Before cutting, I drilled a hole in each corner of the square I marked out. I used the biggest metal drill bit I had to drill the holes.
Once drilled, I used an angle grinder to cut the square hole, slowly and carefully cutting between each drilled hole. I hate cutting through metal and a jigsaw is apparently a lot nicer to use, but an angle grinder is all I had to hand.
Angle grinders fling metal filings everywhere, so you may want to fit a canopy below where you’re cutting in order to catch the majority of the filings.
Another good idea is to leave a few millimetres of metal uncut either side of each drilled hole to stop the metal drooping down when you cut the final edge. This way it keeps the panel in place once you’ve cut all four edges and then you can make the final cuts. Unfortunately, I thought of this after I’d cut my holes.
Once I had my (almost) straight square hole, I filed down the edges to make sure they weren’t sharp and then applied some white metal paint to the exposed metal to prevent rusting.
I then got out the trusty vacuum and made sure as much of the metal filings on the roof were sucked up. Apparently they can stick very easily and then rust. No bueno.
Fitting and Sealing the Vent
I then placed my new vent in the newly cut hole, firstly to check that I’d cut the hole big enough, and secondly to see where the screw holes would line up with the roof. As you’re most likely aware, the roof of a Sprinter has ridges that run length ways, which can make a bit of an uneven surface. I applied Mastic tape around the full width of the square hole directly below where the screws would be, to firstly create a tight seal around the base, but also to help try and make the area level before placing the vent on top. Mastic tape is very sticky but can be moulded very easily to the space.
On top of the Mastic tape, I then applied a layer of sealant, making sure there were no gaps, and then sat the vent in place.
Then, using a 2.5mm drill-bit, I drilled each of the screw holes in the frame of the vent. There were circular markings in the vent’s plastic frame to show you where they should go. I drilled down through the plastic, sealant, mastic and then metal roof of the van.
I then screwed in each of the metal screws provided into each of the holes I had just drilled to fix the vent down.
Further Waterproofing
To further reduce the chance of water getting through, I used some more sealant around the edge of the vent as well as over each screw. The paper from the Mastic tape, and my finger, were good tools to smooth the sealant around the edge.
After my terrible experience with the previous leaky vents, and also not having faith in my own work, I decided to go for triple-threat water protection - After the sealant had dried, I applied Dicht-Fix all around the edge of the vent.
I stupidly didn’t think to check what colour the sealant was, so I have a nice dark grey smudging around the vent and then the mud colour Dicht-Fix to add to the monstrosity. No one will see the roof of my van I guess…


Wiring Up
After the tragic and overcomplicated process of fitting my vents on the roof, I’m pleased to say the process of wiring them to my electrical system was far more simple (and rewarding).
I decided not to connect my two vents in series or parallel, but just to connect them individually to my 12V fuse box.
Each fan had a positive and negative cable which I attached a male cable connector to. The cable connectors I bought were heat-shrinkable so after they were crimped in place, I could just hit them with a heat gun to make a tight connection.
I then cut some lengths of red and black 1.5mm cable and attached a female cable connector to one end and a hoop connector to the other end. This allowed me to attach one end of the cable to the male connector coming out of the fan and then use the hoop connector to allow me to screw the cable to my fuse box.
For both vents, I attached the negative cables to the negative terminal of the fuse box, then the positive ends to their own terminals to allow me to fuse them separately.
To work out what size fuse to use, you can use the equation Watts = Volts x Amps.
Looking at the documentation for my particular roof vent, they pull about 60watts each. 60 (watts) divided by 12 (volts) = 5 (amps). To give me a bit of a buffer, I then multiplied 5 by 1.25 (essentially adding 25%) which gave me 6.25. The closest blade fuse to that was 7.5amps, so I used a 7.5amp blade fuse for each vent.


If you have any questions at all, feel free to ping me an email or drop me a message on Instagram!


